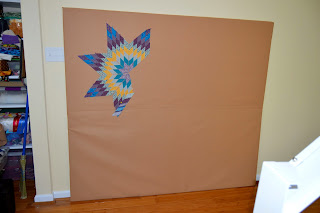
There are only two more "big" projects in my sewing room.
First the design wall and then the peg board. We made a lot of progress on the design wall this week!
I perused lots of U-tube tutorials on constructing a design wall. Got a lot of ideas. Then came reality.
First, the insulation product used in the tutorial I wanted to use was not available in our area. Went back and saw the tutorial was 4 years old. OK, so I'll just use a large one. Opps...we may be the only couple in Georgia without a pickup truck nor SUV...the board did not fit in a Mazda...not even close.
So the nice man at Lowes (a home improvement store) cut the board into three pieces for me...
But when I came home I couldn't quite decide how to put them on the wall...the leaned there for a day or so....then i decided to cut one of the pieces and two and the plan came together again!
I have been looking at coverings - flannel, batting, wool, or felt - for the past couple weeks. The main selection requirement was color and cost. I ended up using a wide felt the color of a supermarket paperbag.
So then it came time to put all this together. I sort of followed the original tutorial...taped the boards together using duct tape (although the fancy tape...only because it was on sale!)
Then both taped and flat tacked the felt onto the board.
It works!
This star block stayed up on its own for 12 hours....though if need be I can pin to the insulation board...
Now if I can just find the Lowes bag with the Command Strips I will put this up on the wall and call it done!!! The Cost? The board was about $13...the felt was $12 (had a half off coupon!), the tape was $1.59 and the pins were on hand. The command strips are another $10. So for less than $40 I have a 64 by 72 sturdy design wall!


7 comments:
i like your design wall , my [dining] sewing room doesn't have a wall without doors so i need a stow away one. in Ga , n. west corner, so have lowes also Marvins which might have the same thing.
Nice work! You will make good use of it. I followed pretty much the same plan but used Hobb's 80/20 batting on mine (I think!) Unfortunately, I also have a huge cutting table in the way which makes it difficult to access easily. so it's mostly a "pin some fabric panels that I don't know what to do with on" board... ;-)
woohoo, fabulous. was the stuff you were supposed to buy "hemosote?" I'm always seeing that for design walls but yet to find it in a store.
Don't know how I ever survived without my design wall. I have also covered a few smaller foam core boards from the hobby store and keep them behind my sewing room door. They are great for smaller projects and parts of projects when the design wall is in use with other things.
Yeah what a great design board, very pleased for you, looks great.
Oh that's the kind of design wall I want too. At the moment I have a king size bed sheet hanging from a post screwed to the wall. I have to pin (like in basting) my blocks to the sheet and I find it tedious when I have to change the blocks around a lot. Thanks for the instructions :)
I only have one full length wall in my sewing room--no place for a great design wall like yours! That paper bag color is a nice toasty tone :)
Post a Comment